
Quick Start
30-Second Impatience Guide
DO THIS NOW (In Order!)
- Bills Tab
- Enter recurring bills
- Use day of month (1-31) for due dates
- Debts Tab
- List all debts
- Order by highest interest or lowest balance
- PayDayPay Tab
- Enter next pay date
- Add bills due before next paycheck
- Split large bills across paychecks if needed
- Snowball Tab
- Enter snowball amount in top of Column B
- Select debts from dropdowns
- Update balances monthly
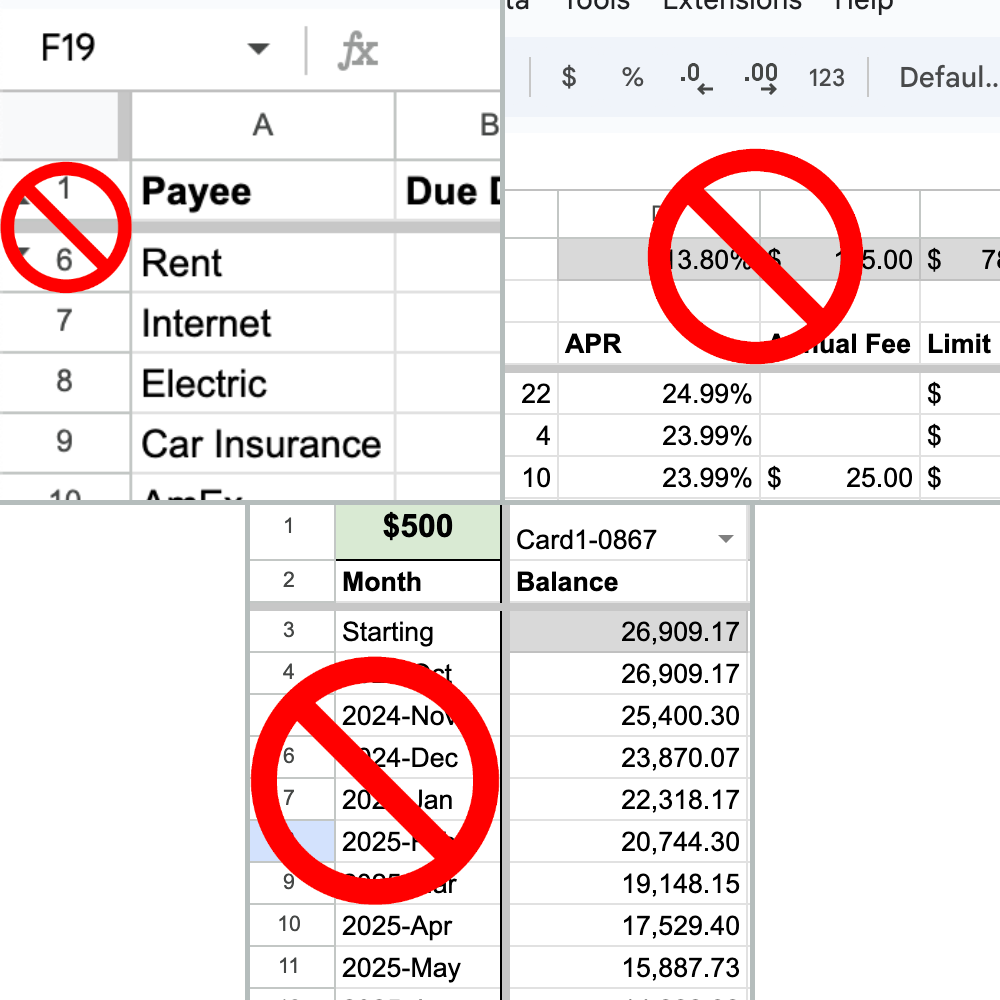
DON’T TOUCH
- Gray cells
- Hidden rows/columns
- Months in Column B of Snowball
CRITICAL CONCEPTS
- Trust Debt Destroyer balance, not bank balance
- Copy pay periods monthly or per paycheck
- Update to real amounts when bills arrive
WHEN STUCK
- Check full guide
- Don’t modify formulas
- Make backups before big changes
That’s it! Start entering your data. Details in full guide below.
Detailed Usage Guide
Overview
The Money@: Debt Destroyer spreadsheet helps you:
- Align bills with paychecks
- Track and eliminate debt using the snowball method
- Manage your money with confidence
Getting Started
- Excel: Coming soon!
- Google Sheets: Create a copy (File > Make a Copy)

- First-Time Setup:
- Start with Bills and Debts tabs
- Move to PayDayPay and Snowball for tracking
- Critical Warnings:
- Never modify hidden rows/columns
- Gray cells contain essential formulas
- Back up regularly (especially for Excel users)
Key Concepts
Debt Destroyer Balance vs Bank Balance
- Debt Destroyer shows available funds, not your bank balance
- Your bank balance may be higher than Debt Destroyer shows
- Consider the Debt Destroyer balance your “available to spend” amount—it’s where your money’s at!
Bills to PayDayPay Workflow
- Bills tab holds estimated/average amounts
- PayDayPay shows actual amounts for each period
- Update PayDayPay with real amounts as bills arrive
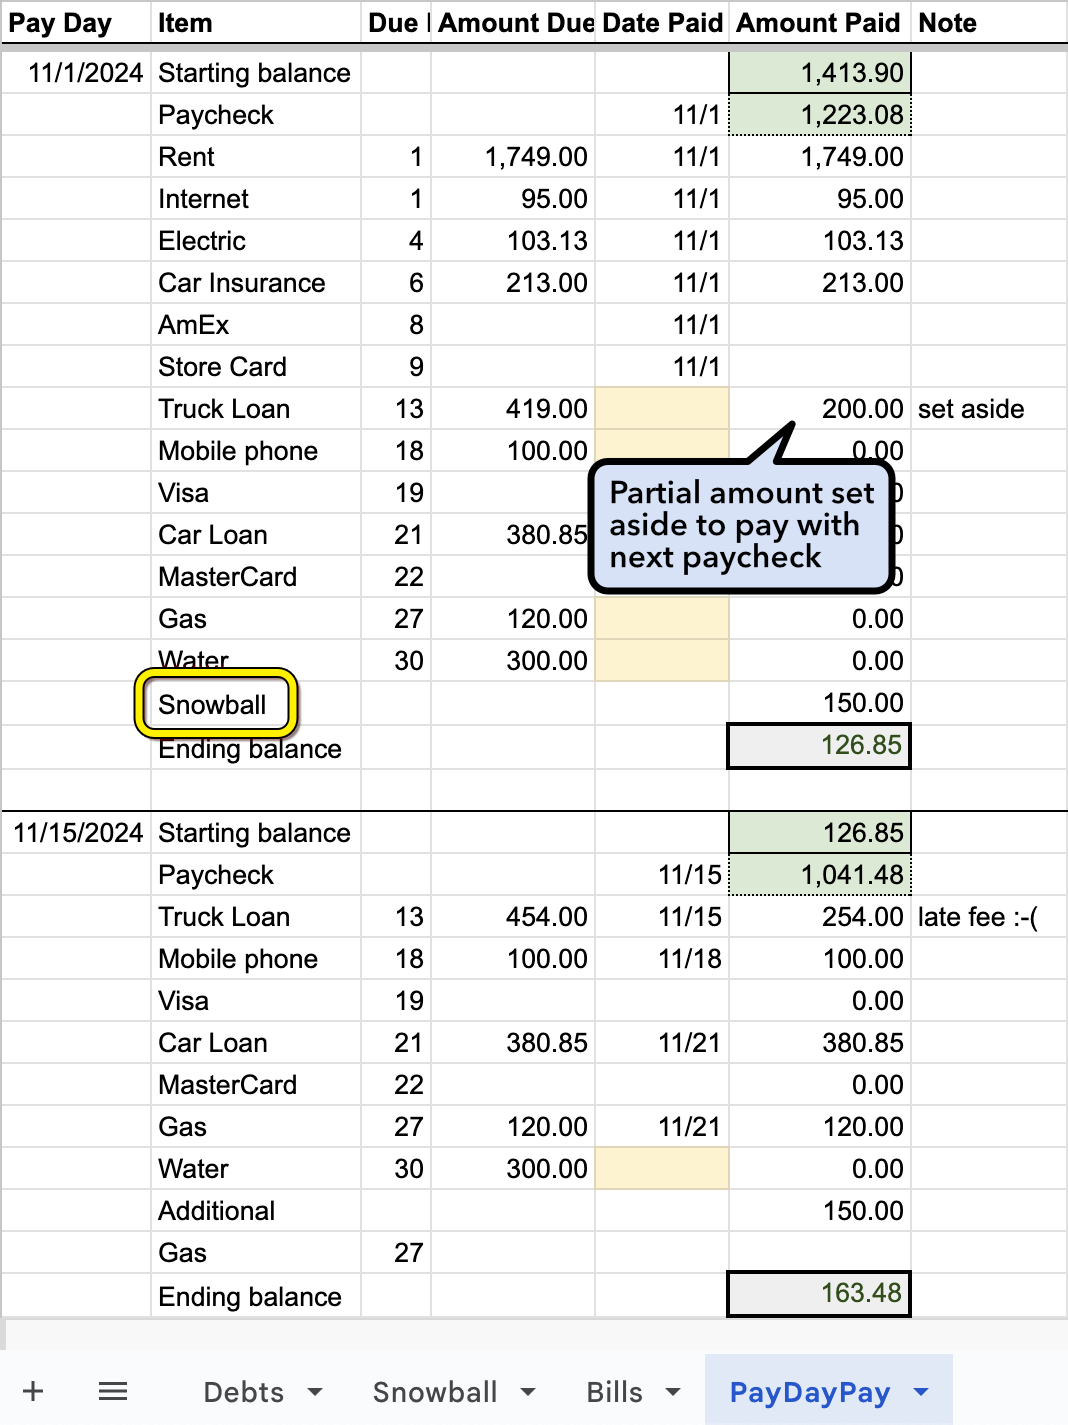
Split Payments
- Large bills can span multiple pay periods
- Example: $1,600 rent split across two $800 payments
- Track each portion in its pay period
Detailed Sheet Guide
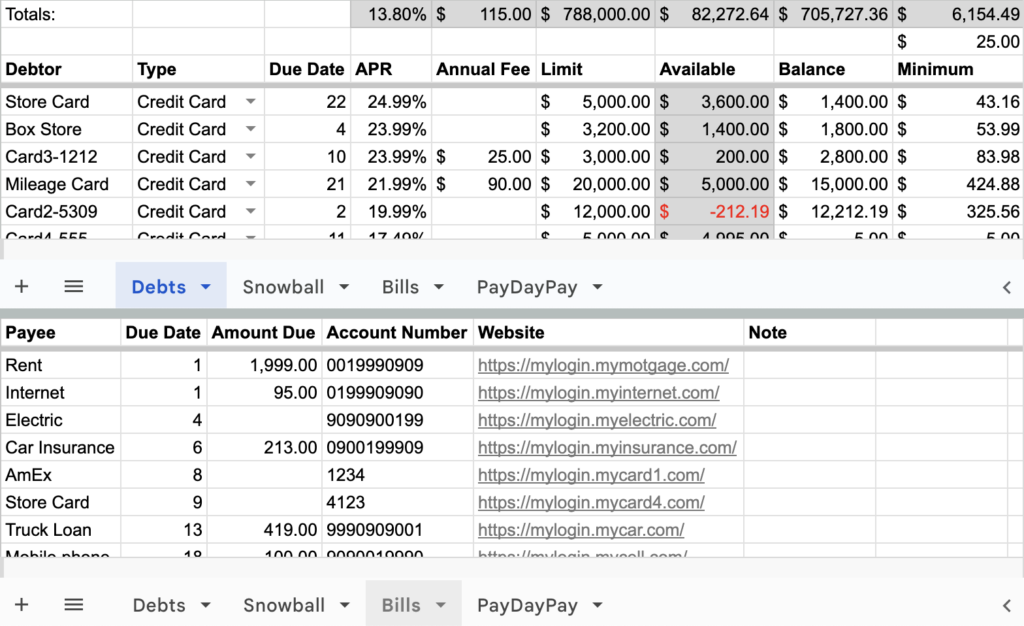
1. Debts Sheet
Purpose: Tracks all debts and feeds Snowball calculations.
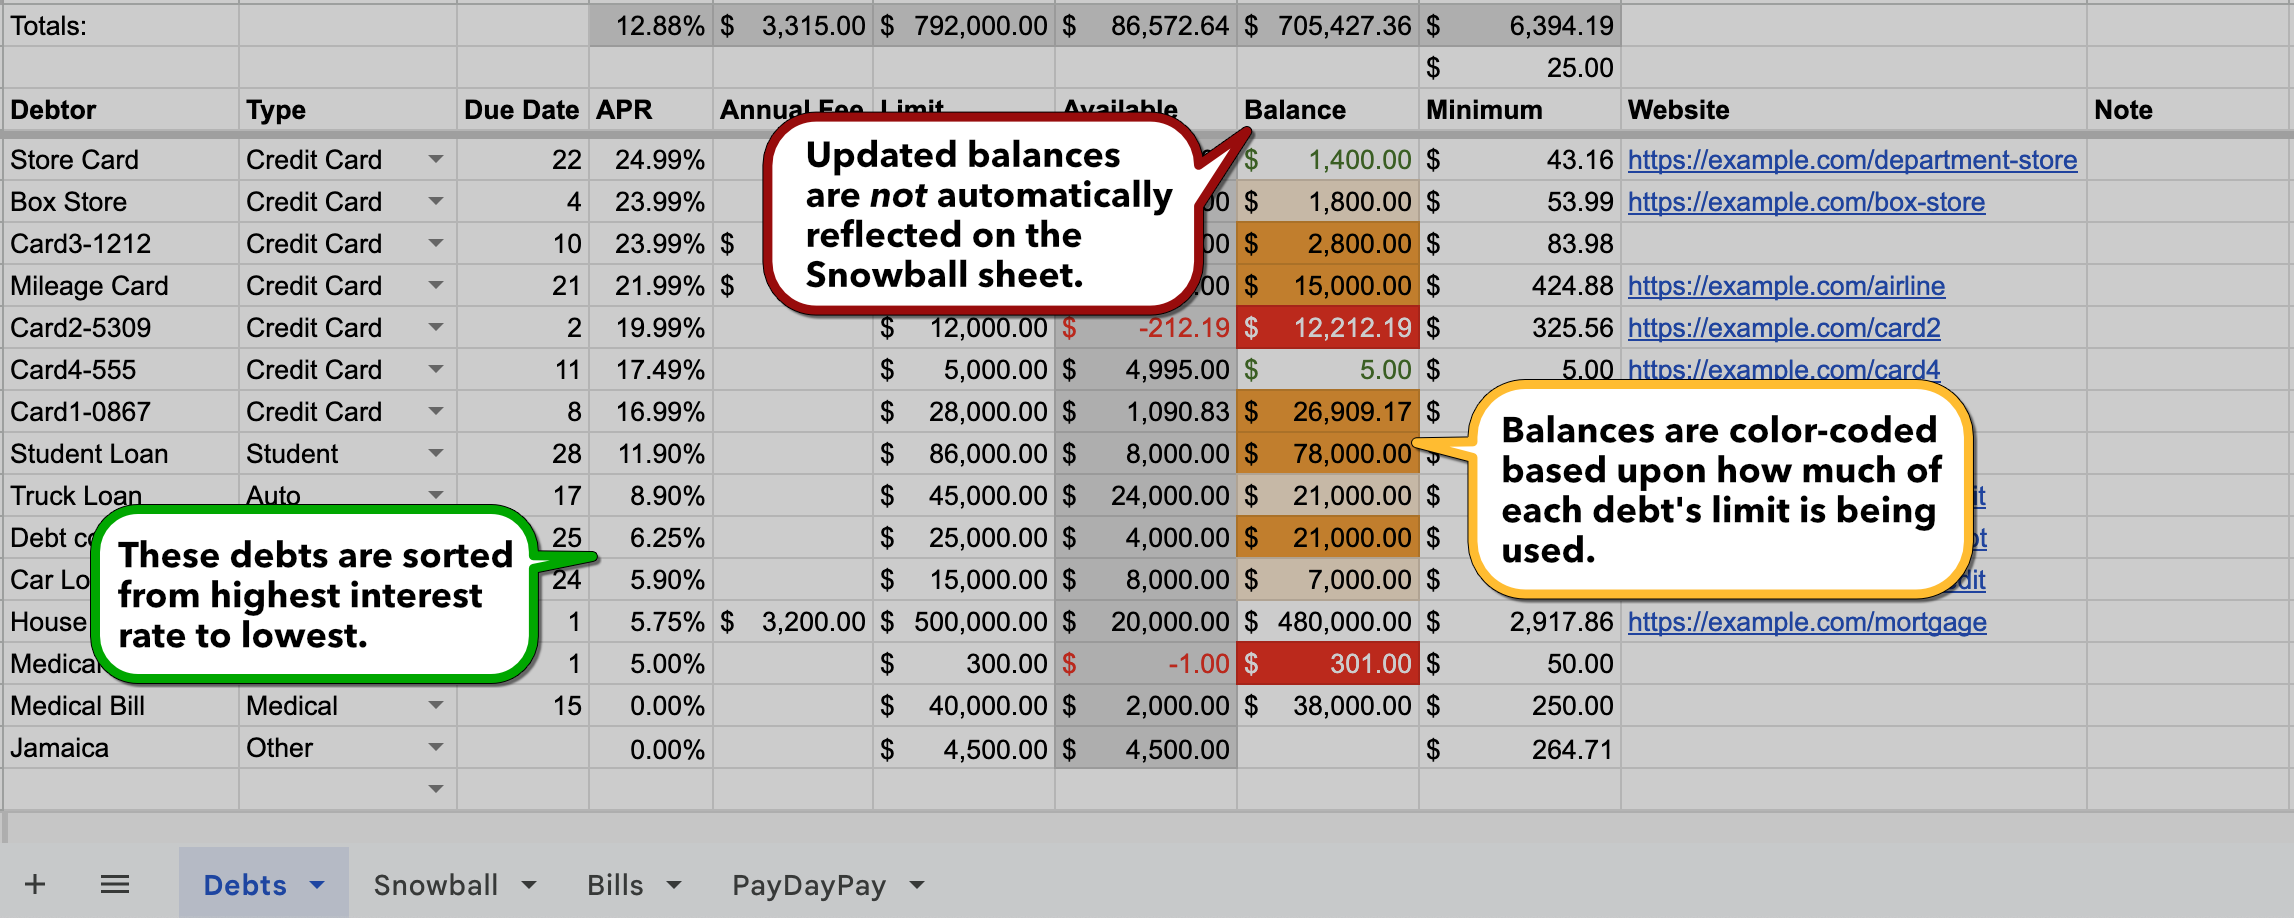
Setup
- Enter debts in preferred snowball order
- Update balances monthly
- Monitor credit utilization indicators
Key Features
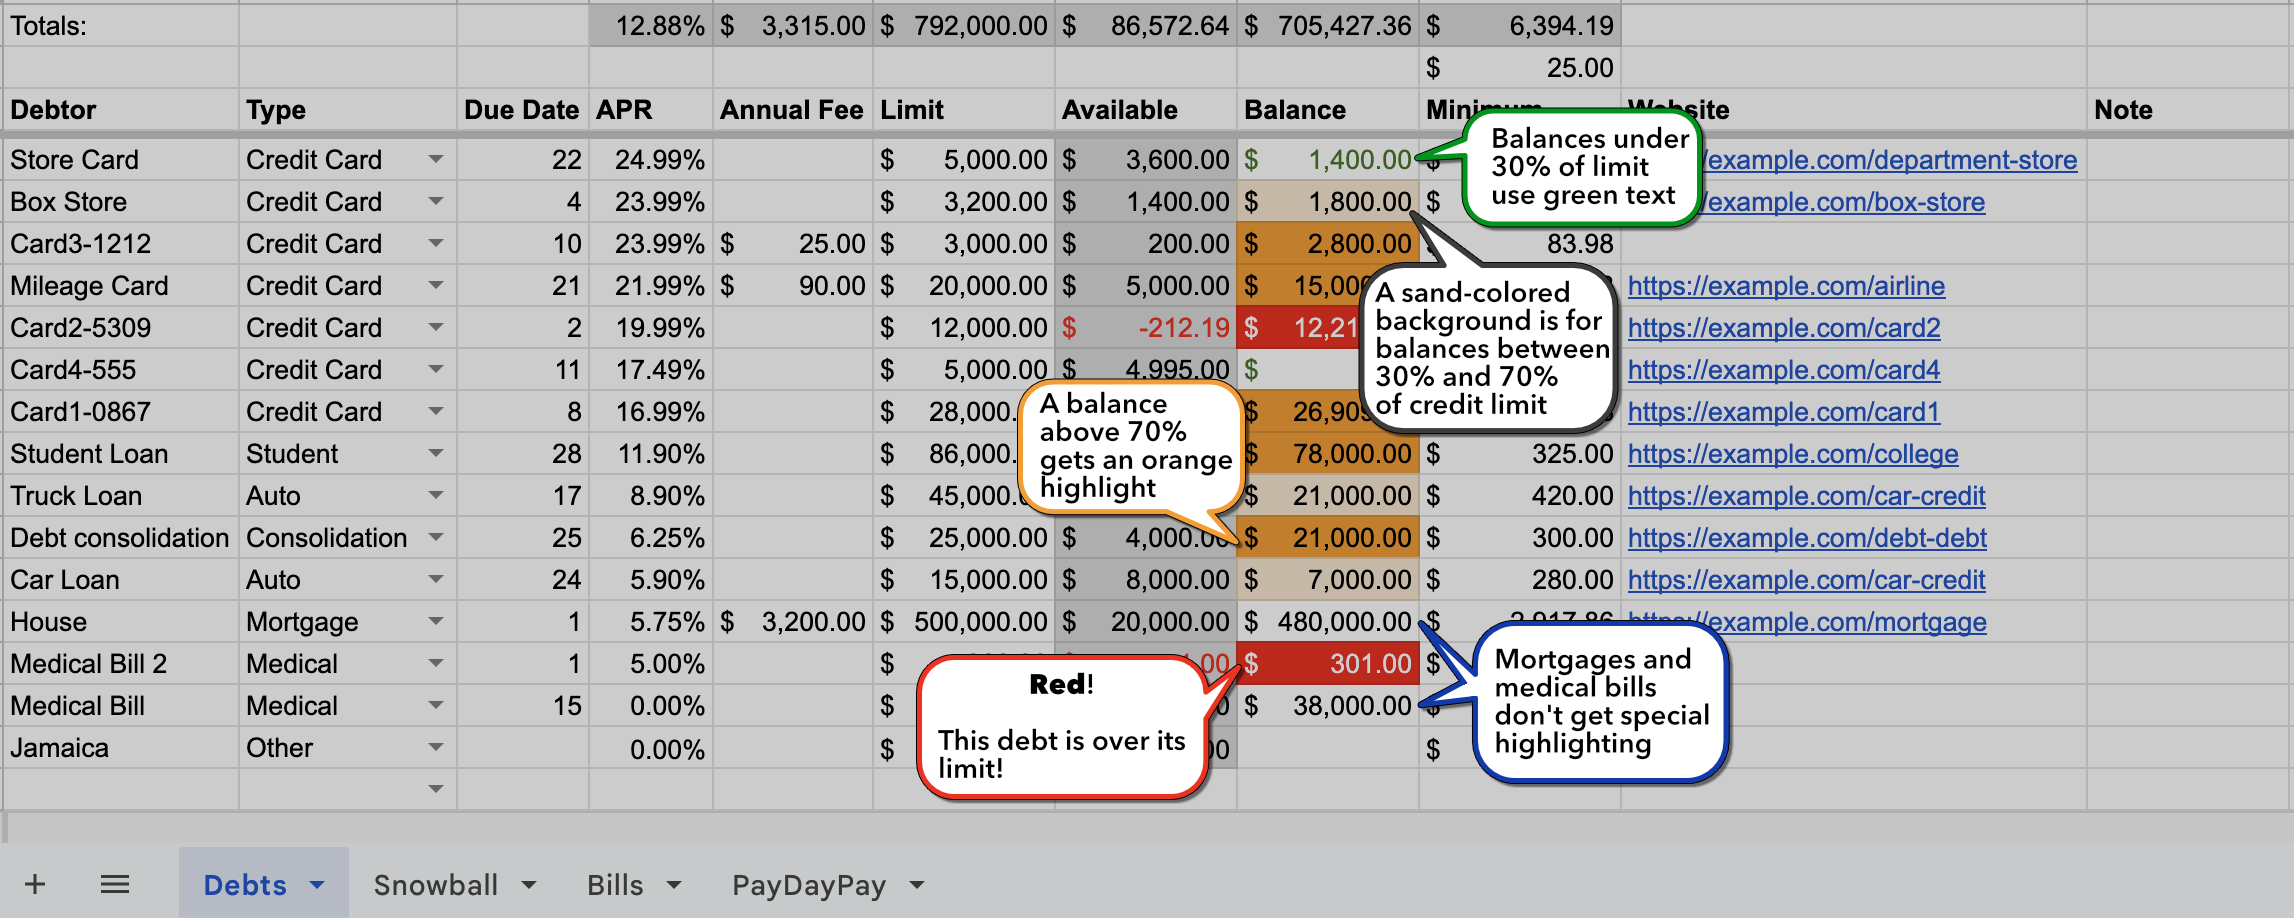
- Conditional formatting for credit cards
- Red: Over limit
- Yellow: ≥70% utilized
- Pale yellow: ≤30% utilized
- Summary calculations
2. Snowball Sheet
Purpose: Calculates debt payoff timeline and automates snowball method.
Initial Setup
- Enter snowball amount in Column B
- Select debts using dropdowns
- Verify initial balances
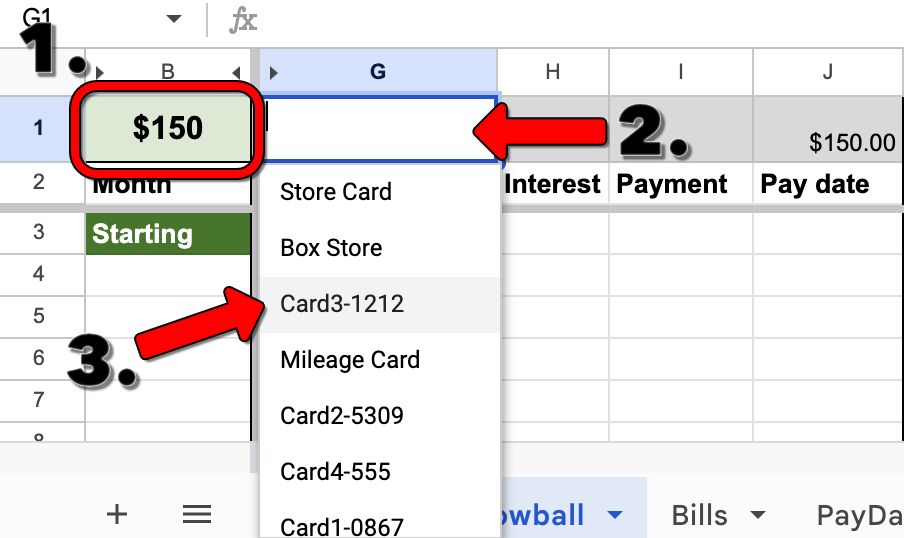
Monthly Updates
- Update current month balances
- Monitor projected payoff dates
- Adjust snowball amount if needed
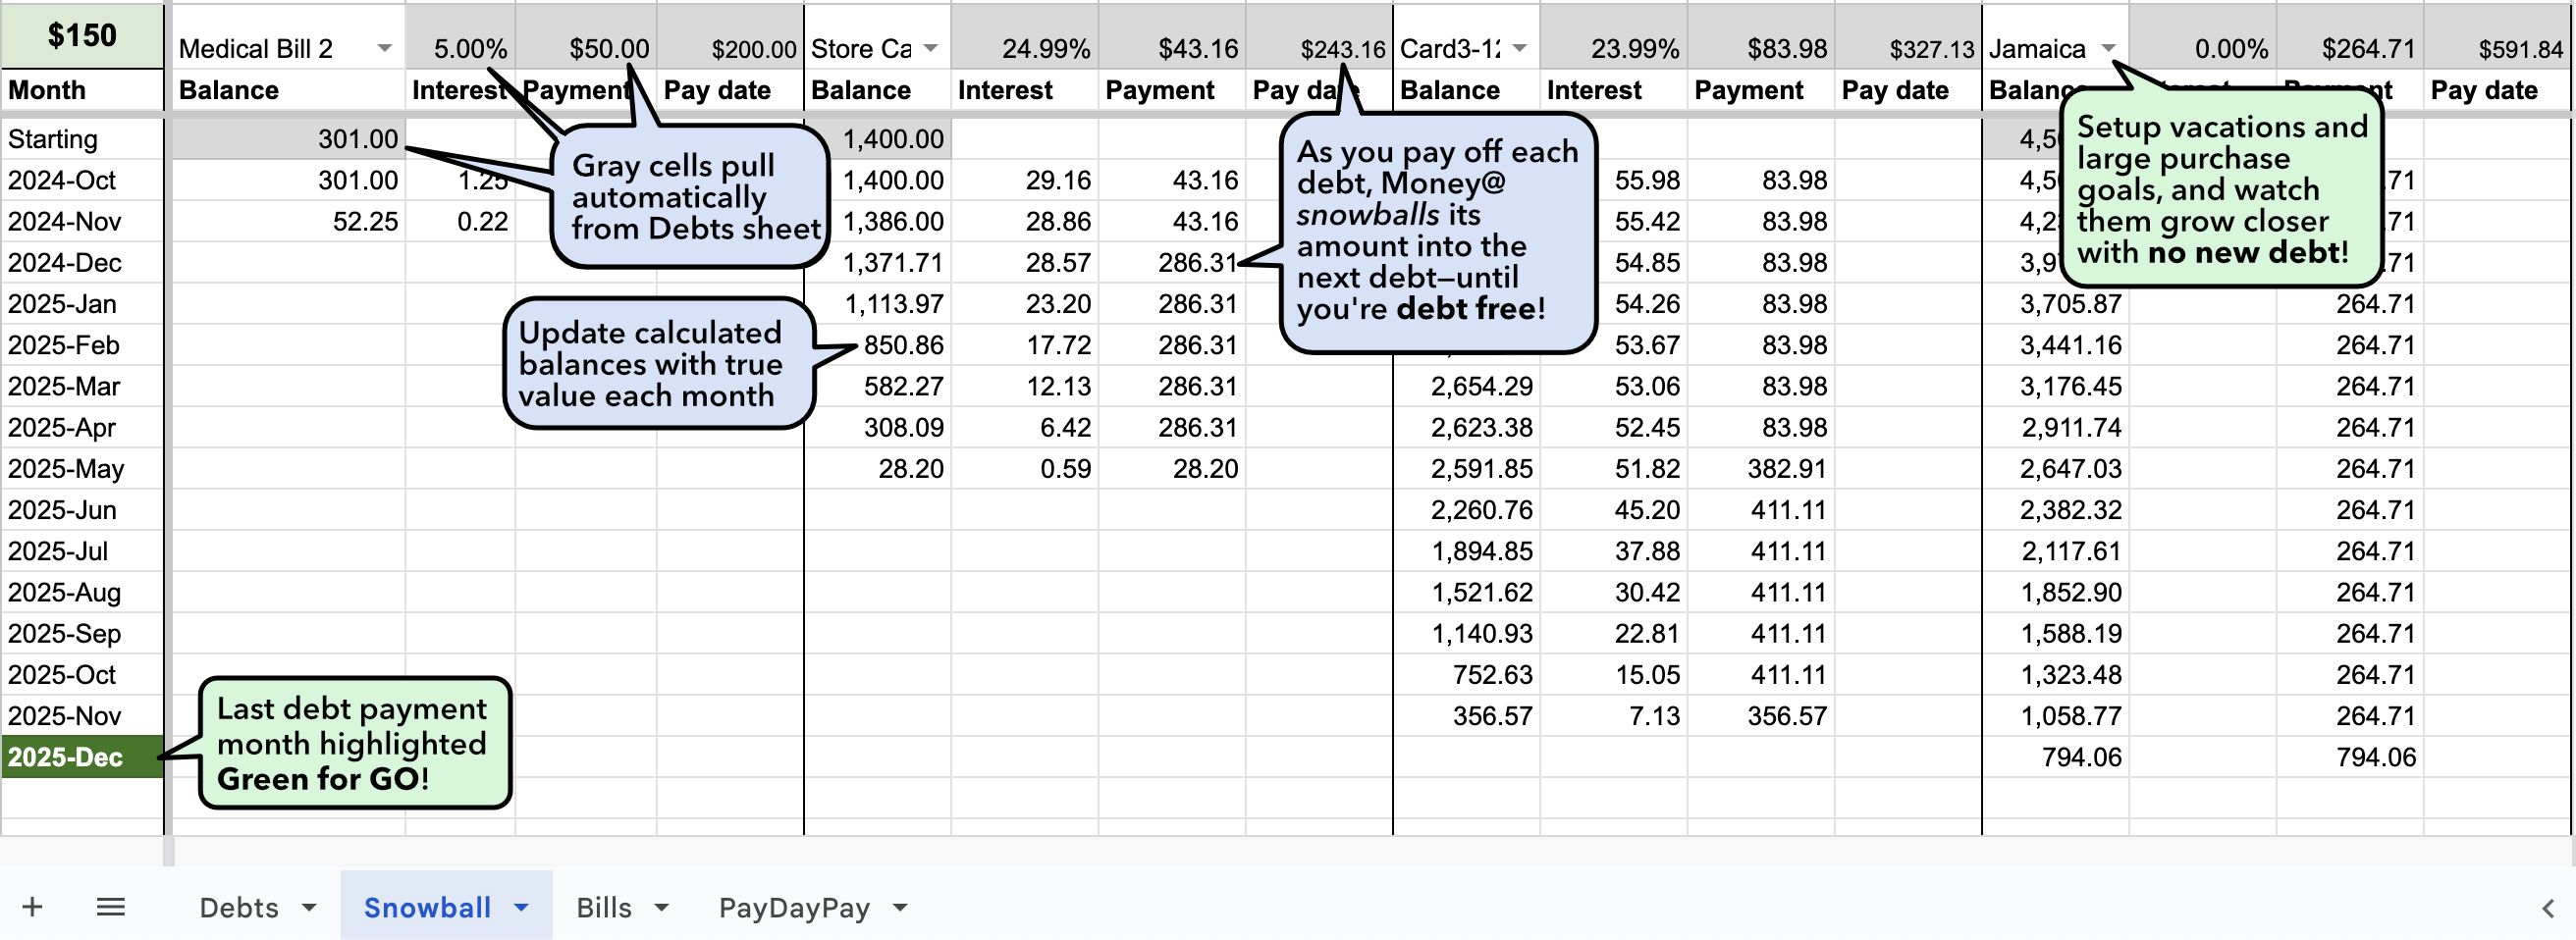
Key Features
- Automatic payment rollover
- Interest calculations
- Payoff date projections
3. Bills Sheet
Purpose: Central repository for all recurring bills and foundation for PayDayPay planning.
Setup
- Enter bills in order by due date
- Use numeric due dates (1-31), not actual dates
- Enter estimated/average amounts
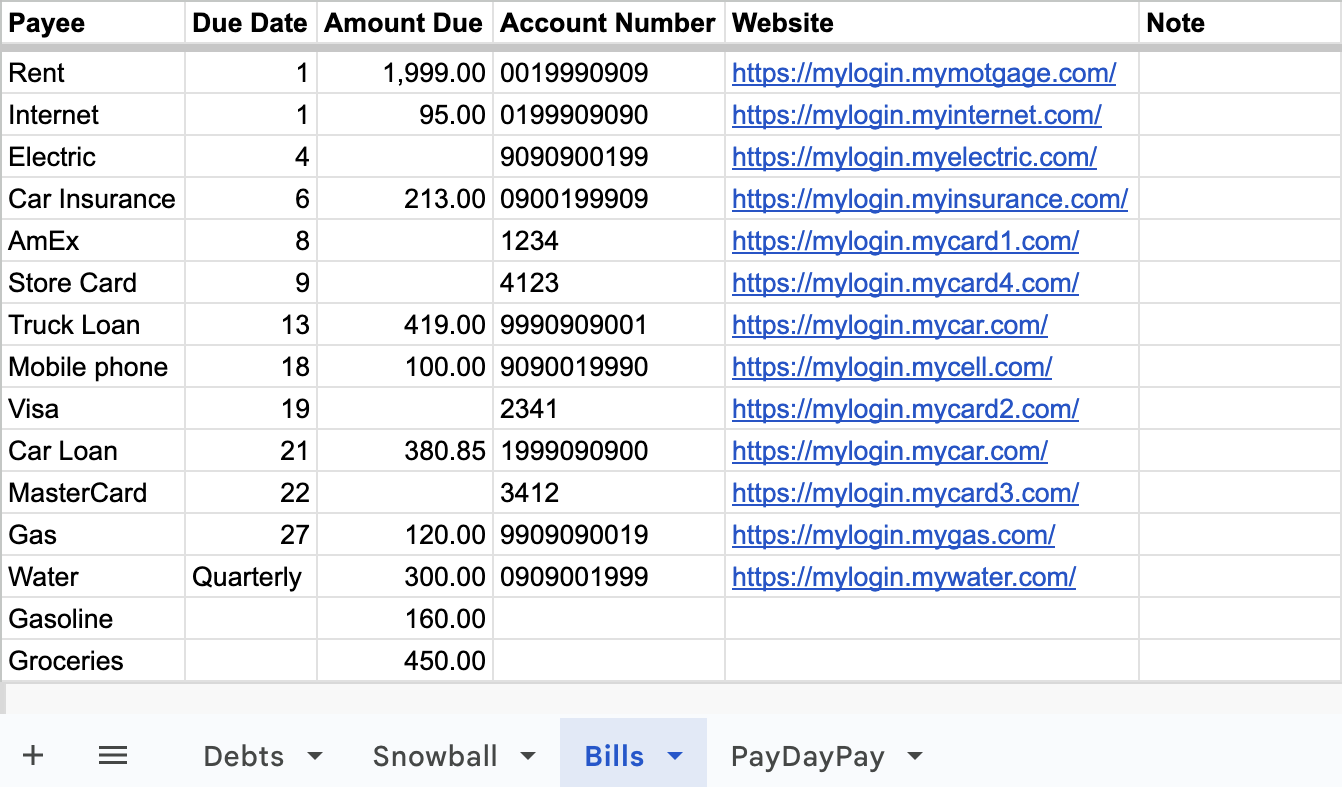
Key Fields
- Name: Bill identifier
- Due Date: Day of month (integer)
- Amount: Typical amount due
- Account, Website, Note: Reference only
Monthly Maintenance
- Update amounts if consistently different from estimates
- Add new bills as needed
- Consider hiding old rows yearly for performance
4. PayDayPay Sheet
Purpose: Aligns bills with paydays and tracks actual payments.
Pay Period Setup
- Enter pay date in leftmost column
- Add bills due before next paycheck
- Include split payments where needed
Copying Between Periods
- Select rows from previous period
- Copy and paste below last entry
- Clear “Date Paid” and “Amount Paid”
- Update for current period
Copy-Paste Workflow
- Select Previous Pay Period
- Click first row number
- Drag to last row
- Copy Selected Rows
- Right-click > Copy, or
- Ctrl/Cmd + C
- Paste Below Last Entry
- Click first empty row
- Right-click > Paste, or
- Ctrl/Cmd + V
- Clear Payment Information
- Select “Date Paid” and “Amount Paid” columns
- Delete contents (not columns)
- Update for Current Period
- Verify bill amounts
- Remove irrelevant items
- Add new bills as needed
Important Concepts
- Money@ balance vs bank balance
- Handling unpaid bills
- Split payment tracking
Real-World Scenarios
Scenario 1: Split Rent Payment
Example: $1,600 monthly rent split across two paychecks
- Bills Sheet Setup
- Enter full amount ($1,600)
- Note “split payment” in comments
- PayDayPay Implementation
- First paycheck: $800 allocation
- Second paycheck: $800 allocation
- Track both entries
Scenario 2: Variable Utility Bill
Example: Electric bill varying seasonally
- Bills Sheet Setup
- Enter average amount
- Note “variable” in comments
- PayDayPay Handling
- Update actual amount when bill arrives
- Adjust other allocations if needed
Scenario 3: Credit Card During Payoff
Example: Using credit card while paying it off
- Debts Sheet
- Update balance monthly
- Note new charges in comments
- Snowball Impact
- Higher balance affects payoff date
- May need to adjust snowball amount
Scenario 4: Reordering Debts Mid-Snowball
Example: Changing debt priority
- Excel Process
- Use “Insert cut cells”
- Verify formula updates
- Google Sheets Process
- Multi-step reordering
- Formula verification
Enhanced Monthly Workflow
Start of Month
- Update Bills Sheet
- Verify all recurring bills
- Update average amounts if needed
- Add new bills
- Update Debts Sheet
- Update all balances
- Check for rate changes
- Verify minimum payments
- Prepare PayDayPay
- Copy previous period
- Clear payment tracking
- Update starting balance
Each Pay Period
- Initial Setup
- Verify starting balance
- Check upcoming bills
- Plan split payments
- During Period
- Track payments as made
- Update actual amounts
- Note any variances
- End of Period
- Reconcile payments
- Plan next period
- Note any issues
Monthly Debt Update
- Update Debts sheet balances
- Verify Snowball calculations
- Adjust snowball amount if needed
Troubleshooting Guide
Common Pitfalls
- Formula Overwrites
- Affected areas
- Prevention steps
- Recovery options
- Copy-Paste Errors
- Common mistakes
- Verification steps
- Correction process
- Balance Mismatches
- Causes
- Detection
- Resolution
Common Issues
- Formula overwriting
- Copy-paste errors
- Balance mismatches
Excel vs Google Sheets
- Copy-paste differences
- Conditional formatting variations
- Backup procedures
Best Practices
Data Management
- Regular backups
- Annual sheet cleanup
- Balance reconciliation
Financial Tips
- Maximizing snowball amount
- Handling variable bills
- Emergency fund considerations
Future Migration
- Keep data clean and formatted
- Maintain payment history
- Follow recommended workflows
Version-Specific Notes
Excel Users
- Enable macros
- Save to OneDrive for history
- Use “Insert cut cells” for debt reordering
Google Sheets Users
- Make copies for backup
- Use version history
- Follow multi-step debt reordering process